2-way switching provides convenience and safety in homes. Consequently, wiring a two-way light switch is a common task in homes. This is frequent in spaces where convenience and safety matter.
A 2-way setup allows the user to control a single light from two different points. Most of these points are upstairs and downstairs. This setup is ideal for hallways, staircases, and rooms that have more than one entry door.
The concept may look confusing at first, but once you understand how the switch terminals work and how the travelers connect, the process becomes far easier to follow.
This article explains the wiring of a 2-way light switch. It makes clear what it is, how it works, and its applications.
What a 2-Way Light Switch Does
A 2-way switch changes the path of the electrical live conductor so that either switch can complete or break the circuit feeding the lamp.
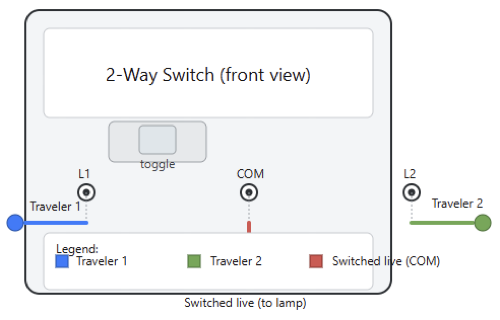
Each switch has a terminal labeled “COM” (common) and two terminals usually labeled “L1” and “L2,” which act as traveler points.
When you flip the switch, it shifts the live feed from COM to either L1 or L2, and the second switch repeats this process.
Together, both switches determine whether the lamp connects to power. This explains why the light can be turned on from point A and then turned off from point B.

Where 2-Way Switching Is Typically Used
You will find 2-way switching in many areas of a home where people need to control a light from different positions.
A common significant example of 2-way switching is in hallways, which typically have entry points at both ends.
In addition to hallways, staircases benefit from this setup. This arrangement allows a user to turn the light on at the bottom (downstairs). They can then turn it off at the top (upstairs).
Some large living rooms, garages, and bedrooms use 2-way switching. This is for added convenience.
This arrangement prevents situations where you are forced to cross a dark room just to reach a switch. It improves safety.
Basic Operating Logic
The logic behind 2-way switches is straightforward, even if their operation may appear complicated.
The aim of each of the two switches is to direct the live feed through one of two traveler wires.
The position of switch A must match the position of switch B for the circuit to complete. Once this condition is met, the lamp turns ON.
This means they both routed the live feed through the same traveler. If the two switches route power through different travelers, the circuit breaks, and the lamp remains off.
The clever part is that either switch can change the state of the light, regardless of the other switch’s current position.
Safety Steps Before Starting the Wiring Work
As mentioned above, electricity is dangerous, and we have to take several measures before handling any electrical wiring. So, here some few steps briefly explained
- First, switch off the power at the main breaker.
- Verify if the circuit is dead using a voltage tester. It is not safe to rely on a switch alone.
- Wearing insulated gloves is a good option. Also, ensure that you work in a dry environmental condition.
- Tools must be kept organized, and avoid leaving bare copper exposed longer than necessary.
- If observing discolored and brittle wiring, stop the installation immediately and call a licensed electrician/technician. This is also applied to the old wiring.
When dealing with electrical work and installations, safety must always be the first priority.
One of these safety measures is to turn off the power to the main breaker panel. Notice that this must be done before handling any electrical wiring activity. Then, it must be preceded by verifying if the circuit is dead using a voltage tester.
Tools Required for Wiring a 2-Way Switch
To complete the installation, you need electrical tape, a voltage tester, wire strippers, and a screwdriver set. Pliers can help you bend or shape conductors before inserting them into terminals.
A multimeter is not that much required, but it can make troubleshooting much easier. This is especially true when the circuit does not function correctly on the first attempt. Qualified personnel should make sure all of the tools have insulated handles and are in good condition before beginning to work with them.
Materials for the Installation
The needed materials during installation are double 2-way switches of type single-pole double-throw.
You will need a length of suitable three-core or four-core cable, depending on local wiring requirements, as well as a junction box.
The junction box is necessary only if the wiring layout requires one. Also, a ceiling rose or light fixture and proper connectors.
Ensure that all materials meet local electrical standards. Uncertified materials must be avoided because they can cause premature failure, overheating, or loose connections.
Understanding Switch Terminals: COM, L1, and L2
Every 2-way switch has a COM terminal that either receives or sends the live feed. When you flip the switch, COM connects to either L1 or L2.
These L1 and L2 terminals form the traveler pair that runs between the two switches. The direction of the current through these travelers determines whether the lamp sees a complete circuit.
Misplacing the COM wire is the most common mistake people make when wiring a 2-way switch, so always check terminal labels carefully.
Two Common Wiring Methods
The traditional 3-wire method and loop-in method are the two standard methods used for wiring a 2-way light switch. Both achieve the same result, but the cable routing differs.
The traditional method sends both travelers and the common wire directly between the two switches, while the loop-in technique keeps neutrals and permanent lives at the ceiling rose and sends only the switching wires to the switches. Both are widely used, and the choice depends mostly on the house’s wiring layout.
How the Traditional 3-Wire Method Works
In the traditional 3-wire method, live power enters the first switch at the COM terminal. Two traveler wires run between the two switches.
This leads to the connection of L1 to L1 and L2 to L2. The second switch uses its COM terminal to send switched live to the lamp.
The lamp’s neutral bypasses the switches and goes directly to the lighting circuit’s neutral point. This method is simple to trace, making it popular for older or simpler installations.
Wiring the Traditional 3-Wire Method
As stated above, one should start by turning off the power before starting to wire the system.
Mount both switches and run a three-core cable between them. Strip the wires and insert the live feed into COM on switch one. Connect the first traveler to L1 on both switches.
Connect the second traveler to L2 on both switches. Then run a wire from the COM on switch two to the lamp’s live terminal.
Ensure the neutral from the lamp connects directly to the supply neutral. All terminal screws must be tightened carefully, and finally, power to test the system
The Loop-In Method
This is a common electrical wiring technique for lighting circuits where cables are “looped in” at each connection point.
This connection point could be a ceiling rose or a light switch, which helps create a continuous circuit.
Instead of using a separate junction box for every connection, the live (line), neutral, and earth wires are connected directly to the terminals and then continue to the next point in the circuit.
The loop-in method places all neutrals and permanent lives inside the ceiling rose instead of inside switch boxes.
Only the necessary switching wires run down to the wall switches. This keeps the wiring almost perfectly organized and reduces the number of junction boxes.
Many electricians prefer this method in modern homes because it simplifies troubleshooting. Plus, it reduces the number of connections inside the switch boxes.
Steps for Wiring the Loop-In Method
Turn off the power and open the ceiling riser. Identify the permanent live feed, the neutral group, and the switched live terminal. Connect the permanent live to COM on switch one.
Run two traveler wires between the L1 and L2 terminals of both switches. Then connect the COM of switch two back to the switched live terminal on the ceiling rose.
Keep all neutral wires grouped in the rose. After tightening all connections, test the circuit with power restored.
How Power Flows Through the Circuit
The live conductor enters switch 1 and gets routed through one of the two travelers. Switch 2 receives this traveler signal and may either pass it to the lamp or switch it to the other traveler, depending on its position.
When the outgoing conductor from switch two delivers power to the lamp, the circuit completes, and the light turns on.
If the switches route power through different travelers, the circuit breaks, and the lamp stays off.
Testing the Installation
When the wiring is done, it should be double-checked. If everything is OK, then turn on the breaker and try operating the light from both switches. The COM connection is nearly always the problem if neither switch is able to toggle the lamp.
The light may develop the flicking behavior; the issue can be solved by checking for loose screws or damaged conductors.
As a tradition of electrical engineers/technicians, testing the system before closing the switches is a must. This makes sure that any issues can be corrected quickly.
Common Wiring Mistakes and Fixes
The most frequent mistake is mixing up the COM terminal with L1 or L2. Another common error is reversing the traveler wires.
This kind usually causes erratic operation. Always loose terminals tend to cause flickering, heating, or intermittent failures.
If nothing works, the steps mentioned above must be followed. This means turn off the power and inspect each connection.
A continuity tester helps verify which wire goes where. Taking your time during this step avoids hours of frustration later.
Using a Junction Box
If cables cannot reach the switches directly, the use of a junction box becomes necessary. It should be large enough to hold all conductors comfortably. In addition, it must remain accessible according to the electrical code.
Proper connectors must be used inside the box; cables with clamps must be used; and the lid must be firmly closed. Never bury a junction box behind a wall or ceiling without access.
Intermediate Switch
The so-called intermediate switch can be added to control the same light from three or more locations. This is added between the two 2-switches.
This intermediate switch has four terminals and simply swaps or crosses the two traveler wires depending on its position.
You can insert multiple intermediate switches in long hallways or large rooms for additional control points.
Choosing the Right Switch Type
Plastic or metal switch plates can be chosen. Plastic switches are inexpensive and easy to install.
These usually do not require grounding. On the contrary, metal switches look more premium but must be earthed properly.
Local electrical regulations and aesthetics are also to be considered. No doubt, the check must be done to verify that the switches are rated for the correct voltage and current.
Clean and Reliable Wiring
There is no doubt that neat wiring reduces the chance of future problems. Excessive slack may cause a serious problem.
So, trim wires to the proper length so they fit comfortably without excessive slack. Keep travelers bundled neatly to avoid confusion.
The terminal screws must not be overtightened; instead, ensure they are firm. Leave enough room inside the box for heat dissipation and inspection. Clear labeling helps a lot if anyone needs to service the switches later.
Troubleshooting After Installation
The light must not remain on permanently. If this happens, check the travelers for a possible cross-connection.
If the light never comes on, carefully verify that the live feed is actually reaching the first COM terminal.
Most of the time, a buzzing sound from the switch means arcing. This may be caused by a large number of reasons, one of which is a loose connection. Systematically testing each part of the circuit helps isolate the problem quickly.
Modern Alternatives to Traditional 2-Way Switching
In the near future, smart switching systems can replace traditional 2-way wiring. Smart switching systems enable users to control lights through Wi-Fi, apps, or voice assistants. Some smart switches can work in a 2-way configuration, while others require rewiring.
Many require a neutral conductor at the switch box, which older installations may not provide.
Although they offer convenience and features, they are pricier and sometimes harder to integrate into existing wiring.
Conclusion
This article explained how a two-way light switching system works. It also detailed how to mount it, where it can be used, the safety precautions to be considered during the manipulation, and how to wire it safely.
Once the functionality of the COM and traveler terminals is clear, wiring a 2-wire light becomes easy.
The system allows two switches to control one lamp by routing power through two possible paths.
These are mostly staircases (downstairs and upstairs). This installation should be completed using the appropriate materials and tools.
Also, attention to safety should be considered. If these requirements are followed, anyone with basic electrical knowledge can complete the installation.
The key is understanding the wiring method you are using and following it carefully. Qualified personnel are free to choose between the traditional 3-wire system or the loop-in method.
Once you study and follow the diagrams patiently, the process becomes clear. A well-wired 2-way switch increases convenience, safety, and reliability in any home.
FAQ: How to Wire a 2-Way Light Switch
What is a 2-way light switch?
It’s a setup that lets you control one light from two different switches.
What terminals do 2-way switches have?
They normally have COM, L1, and L2.
What cable do I need?
Use a 3-core + earth cable between both switches.
Which wire goes to COM?
On the first switch, the live feed goes to COM. The switch line goes to COM on the second.
What are L1 and L2 for?
They are the traveler wires that link both switches.
Do the travelers cross?
Yes. L1 connects to L1, and L2 connects to L2.
Do I need to turn off the power?
Yes. Always isolate the circuit before touching any wiring.
Can I use any 2-way switch brand?
Yes, as long as it’s labeled COM, L1, and L2.
Why does my 2-way switch not work?
Most failures come from the COM being wired incorrectly.
Are diagrams necessary?
Yes. Follow a wiring diagram to avoid mistakes.
Can a 2-way circuit be used with LEDs?
Yes. It works the same as with standard bulbs.
What if my walls only have two wires?
Then it’s likely a 1-way setup, and rewiring is needed for 2-way control.
Do both switches need COM in the same position?
No. COM positions vary by brand. Always check the label.
